Components of the Framework
The software Pyff consists of four major parts: the Feedback Controller, the Graphical User Interface (GUI), a set of Feedback baseclasses and a set of Feedbacks.

Pyff communicates with the rest of the world via a standardized communication protocol using User Datagram Protocol (UDP) and Extensible Markup Language (XML).
The Feedback Controller
The Feedback Controller manages the communication between the Feedback and the world outside Pyff. It is responsible for spawning new Feedback processes, starting, pausing and stopping them as well as inspecting and manipulating their internal variables.
Once started, the Feedback Controller acts like a server, waiting for incoming signals from the network. Incoming signals are encoded in XML, the Feedback Controller converts them to message objects and -- depending on the kind of signal -- either processes them directly or passes them to the currently running Feedback.
The Feedback Controller starts new Feedbacks by spawning new Feedback-processes. This has the advantage that a crashing or otherwise misbehaving feedback application does not directly affect the Feedback Controller as it would do if we had used Threads. Since this framework also aims to be a workbench for easy Feedback development, misbehaving Feedbacks can be quite common, especially in the beginning of the Feedback development. The communication between two different processes however, is a bit more complicated than between two threads since two processes do not share the same address space. In our framework we solved this issue with an Inter Process Communication mechanism using sockets to pass message objects back and forth between the Feedback Controller and a running Feedback.
The Graphical User Interface
The framework provides a graphical user interface (GUI) which enables easy access to the Feedback Controller's main functions and the Feedback's variables. The GUI communicates with the Feedback Controller like the system connected to Pyff does: via XML over UDP. Therefore, the GUI does not have to run on the same machine as the Feedback Controller does, which is particularly useful for experiments where the experimenter and subject are in different rooms.
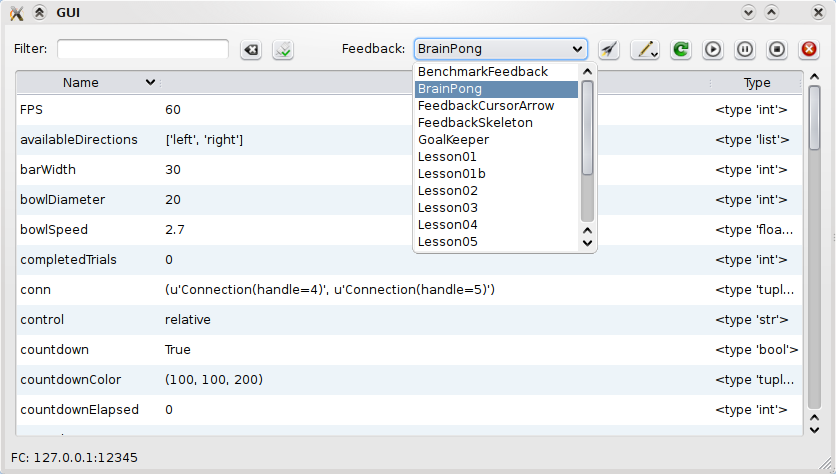
This is a screen shot of the GUI. The drop down menu presents the available list of available Feedbacks. On the right of this list are various buttons for Init, Play, Pause, etc. The main part of the GUI is occupied by a table which presents the name, value and type of the variables of the currently running Feedback. The table is editable so that the user can modify any Feedback variable as desired and send it back to the Feedback where the change is directly applied. The possibility to inspect and manipulate the running Feedback's object variables gives a great deal of flexibility for experimenters to explore and try new settings.
The Feedback Base Classes
The Feedback base class is the the base class of all Feedbacks and the interface to the Feedback Controller's plugin system.
As mentioned in before, the Feedback Controller is able to load, control and unload Feedbacks dynamically. Those Feedbacks can be very different in complexity, functionality and purpose. To work with those different Feedbacks properly, the Feedback Controller relies on a small set of methods every Feedback has to provide. The Feedback base class declares those methods and thus guarantees from the Feedback Controller's point of view a well defined set of operations every Feedback supports.
Those methods are: on_init, on_play, on_pause, on_stop, on_quit,
on_interaction_event and on_control_event. The Feedback Controller calls
them whenever it received a respective signal. For example: when the Feedback
Controller receives a control signal, it calls the on_control_event method of
the Feedback.
Most of the above methods are parameterless, they are just called to let the
Feedback know, that a certain event just happened. Exceptions are
on_control_event and on_interaction_event. Those events carry an argument
data, which is a dictionary containing all variables which where sent to the
Feedback Controller and should be set in the Feedback. For convenience a
Feedback does not have to implement those two methods just to get the data, the
Feedback Controller takes care that the data is already set in the Feedback
before the respective method is called in the Feedback.
The Feedback base class also has a method send_parallel(data) which the
Feedback can use to send data to the parallel port of the machine running this
Feedback, a typical way to set markers into the acquired EEG.
For convenience the Feedback base class also provides a logger attribute. The logger attribute is a logger object of Python's standard logging facility. A logger is basically like the print statement with a severity (the loglevel) attached. A global severity threshold can be set which suppresses all log-messages below that level to appear on the console or in the logfile. The global loglevel and the output format is configured by the Feedback Controller: The loglevel has a default value but it can be modified via the Feedback Controller's command line option. A Feedback programmer can use this logger directly without any extra initialization of the logger whatsoever.
By subclassing the Feedback base class, the derived class inherits all methods from the base class and thus becomes a valid and ready-to-use Feedback for the Feedback Controller. The Feedback programmer's task is to implement the methods as needed in a derived class or just leave the unneeded methods alone.
The object oriented approach drastically simplifies the development of Feedbacks, since common code of similar Feedbacks can be moved out of the actual Feedbacks into a common base class.
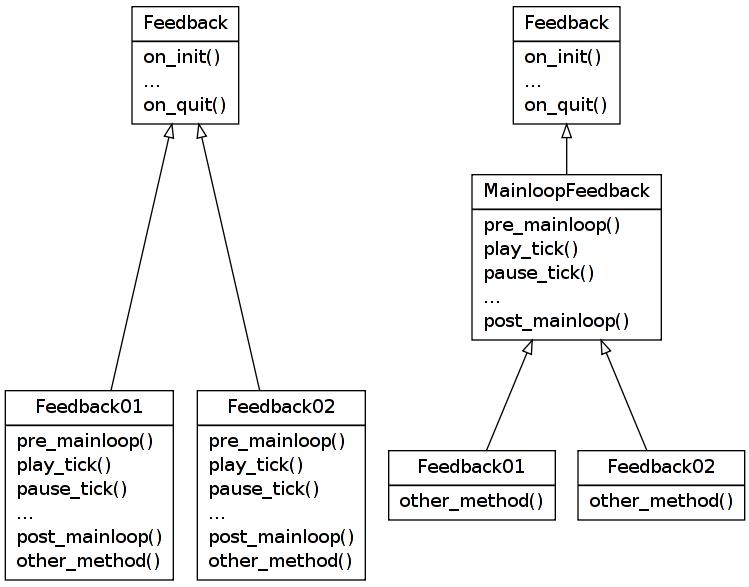
The above figure shows an example: on the left side two similar Feedbacks share a fair amount of code. Both Feedbacks work with a main loop. They have a set of main loop related methods and other more Feedback specific related methods. Implementing a third Feedback with a main loop means probably that the programmer will copy the main loop related part from one of the existing Feedbacks into his new Feedback. This a bad thing for several reasons, the most important one being that a bug in the main loop related logic will probably appear in all Feedbacks and thus has to be fixed in every single Feedback using this logic. The solution is to extract the main loop related logic into a base class and implement it there. The Feedbacks can derive from this class, inherit the logic and only need to implement the Feedback specific part. The code of the Feedbacks is much shorter, less error prone and main loop related bugs can be fixed in a single file.
Feedbacks
Besides providing a platform for easy development of feedback applications, Pyff also provides a set of useful and ready to use Feedbacks. The list of those Feedbacks will grow as we and hopefully other groups develop more of them.
Control- and Interaction Signals
Pyff receives two different kinds of signals: Control Signals and
Interaction Signals. The difference between both is, that Interaction Signals
can contain variables and commands and Control Signals only variables. The
commands in the Interaction Signal are for the Feedback Controller to control
the behavior of the Feedback, the variables contained in both the Control- and
Interaction Signals are to be set in the currently running Feedback.
Technically both variants are equivalent but practically they are used for
different things: The variables in the Interaction Signal are used to modify
the Feedback's object variables and influence therefore the Feedback's
behavior. The variables in the Control Signal are the actual data coming from a
data source like EEG. The distinction is useful for example when a Feedback
needs to do something on every arriving block of data. It then can take
advantage of the fact that incoming Control- and Interaction Signals trigger
on_control_event respective on_interaction_event methods in the Feedback.
The programmer of the Feedback can focus on the handling of the data by
implementing on_control_event and does not have to worry if the variables
send by the signal are actual data or just object variables of the Feedback.
| Command | Meaning |
|---|---|
| getfeedbacks | Return a list of available Feedbacks |
| getvariables | Return a dictionary of the Feedback's variables |
| sendinit | Load a feedback | play | Start the Feedback | pause | Pause the Feedback | stop | Stop the Feedback | quit | Unload the Feedback |
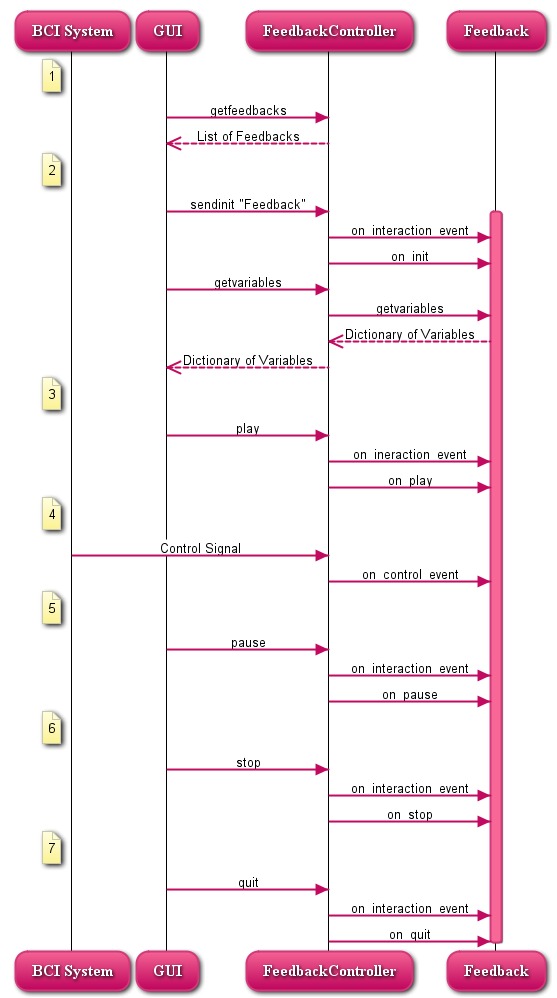
The table above shows the complete list of available commands in Control signals and the figure below shows a sequence diagram illustrating the interaction between the GUI, the Feedback Controller and the Feedback. All signals coming from the GUI are Interaction Signals, the signals coming from the BCI system are Control Singals. Once the GUI was started, it tries automatically to connect to a running Feedback Controller on the machine where the GUI is running. If that failed (e.g., since the Feedback Controller runs on a different machine on the network) the experimenter can connect it manually by providing the host name or IP address of the target machine. Upon a successful connection with the Feedback Controller, the Feedback Controller replies with a list of available Feedbacks which is then shown in the GUI in a drop down menu for available Feedbacks. The experimenter can now select a Feedback in the GUI and click the Init Button, on which the GUI will send the appropriate signal to the Feedback Controller telling it to load the desired Feedback. The Feedback Controller loads the Feedback and requests the Feedback's object variables which it sends back to the GUI. The GUI then shows them in a table, where the experimenter can inspect and manipulate them. Within the GUI the experimenter can also Start, Pause, Stop and Quit the Feedback.
Inter Process Communication
When writing applications, there are usually two possible options to achieve concurrency: The first one is to use threads, the second is to use processes. Processes are heavyweight compared to threads. Processes have their own address space and some form of inter-process communication (IPC) is needed to make processes interact with each other. Threads on the other side are lightweight. There can be one ore more threads in the same process and threads of the same process share their address space. The implication of the shared address space is, that a modification of a variable within one thread is immediately visible to all other threads of this process. A complete description of processes, threads and inter-process communication can be found in (Tanenbaum, Andrew S., Modern Operating Systems, 2001, Prentice Hall PTR). Since there is no need for a IPC when using threads, threads are often more desirable than processes and the sufficient solution for many common concurrent applications. In Python however things are a bit different. First, and most importantly: in Python two threads of a process don't run truly concurrently, but sequentially in a time-sliced manner. The reason is Python's Global Interpreter Lock (GIL) which controls that only one Python thread can execute in the interpreter at once. The consequence is that Python programs cannot make use of multi processors using Python's threads. In order to use real concurrency one has to use processes, effectively sidestepping the GIL. The second important point is that many important graphical Python libraries like pygame or PyQT need to run in the main (first) thread of the Python process. In a threaded version of Pyff this would make things a lot more complicated, since the Feedback Controller as a server runs during the whole lifetime of the experiment, while Feedbacks (where those libraries are used) usually get loaded, unloaded, started and stopped many times during an experiment. The natural way to implement this in a threaded way would be to run the Feedback Controller in the main thread and let it spawn Feedback threads as needed. Doing it the other way round by reserving the main thread for the Feedback and letting the Feedback Controller insert Feedbacks into the first thread on demand would be a lot more complicated and error prone.
For that reasons we decided to use processes instead of threads. The feedback applications have much more resources running in their own process (even on their own processor) while keeping the programming of Pyff's logic simple and easy to maintain.
Inter Process Communication in Pyff
We decided to use a socket based IPC since it works on all major platforms. The basic idea is that two processes establish a TCP connection to communicate. If a peer wants to send a message to the other one, it uses his end of the connection--called socket--to send the message. The message is then sent to the other end of the connection, where the second peer can read it from his socket.
The messages itself are message objects which are serialized on the sending end before being sent and unserialized on the receiving end. Serialization and Unserialization is done using Python's pickle library.
Remote Controlling Pyff
To make the framework as portable as possible to other existing systems it was critical to design an interface generic enough to support a wide range of programming languages and operating systems. This loose coupling is achieved through our choice to use the User Datagram Protocol (UDP) for the transport of the data through the network and Extensible Markup Language (XML) for the encoding of the signal.
UDP was chosen because it is a well known and established standard network protocol and because virtually every programming language supports it. UDP-clients and -servers are fairly easy to implement and is possible to send arbitrary data over UDP. For similar reasons XML was chosen for the encoding of the signals: XML is an established standard for exchanging data and libraries for parsing and writing XML are available for most common programming languages.
Once the FeedbackController started it listens on UDP port 12345 for incoming control- and interaction signals. Clients can remote control the FeedbackController as if they would do using the GUI by sending signals to that address. Those signals have to be wrapped in XML.
Pyff's XML scheme
To wrap the content of the control- and interaction-signals, we chose Extensible Markup Language (XML). XML is a well known, accepted standard and was specifically designed for tasks like this, where arbitrary data needs to be exchanged between different systems.
The Feedback Controller accepts a defined set of commands and arbitrary variables which should be set in the Feedback. A command is a simple string and has no parameters. Those commands are not arbitrary Python statements but a well defined set of commands, the Feedback Controller executes, like loading a Feedback or starting it. A variable is defined as a triple (type, name, value), where type is the data type, name the name of the variable and value the actual value of the variable.
For this purpose, we created an XML scheme capable of containing variables and commands. The following describes the version 1.0 of the scheme.
The root element of this XML scheme is the bci-signal-node which contains an
attribute version, defining the bci-signal version and one child node which
can be either of the type interaction- or control signal.
<?xml version="1.0" ?>
<bci-signal version="1.0">
  <interaction-signal>
    <command value="start"/>
    <s name="string" value="foo"/>
    <f name="float" value="0.69"/>
    <list name="list">
      <i value="1"/>
      <i value="2"/>
      <i value="3"/>
    </list>
  </interaction-signal>
</bci-signal>
Commands
Commands are only allowed in interaction signals and have the following form:
<command value="commandname"/>
where commandname is a member of the set of supported commands. Supported
commands are: getfeedbacks, play, pause, stop, quit, sendinit,
getvariables. Only one command is allowed per interaction signal. An
interaction signal can contain a command and several variables.
Variables
Variables are allowed in interaction- and control signals. A variable is represented by the triple (type, name, value) and has the following form in XML:
<type name="varname" value="varvalue">
for example: an Integer with the variable name foo and the value 42 would
be represented as:
<integer name="foo" value="42">
The XML scheme supports all variable types supported by Python, the table below
shows a complete listing. Sometimes there is more than one way to express the
type of a variable. For example, a boolean can be expressed in this XML scheme
via <boolean ... />, <bool ... /> and <b ... />. All alternatives are
equivalent and exist merely for convenience.
| Type | Type in XML | Example Values | Nestable |
|---|---|---|---|
| Boolean | boolean, bool, b | "True", "true", "1" | No |
| Integer | integer, int, i | "1" | No |
| Float | float, f | "1.0" | No |
| Long | long, l | "1" | No |
| Complex | complex, cmplx, c | "(1+0j)", "(1+0i)" | No |
| String | string, str, s | "foo" | No |
| List | list | Yes | |
| Tuple | tupe | Yes | |
| Set | set | Yes | |
| Frozenset | frozenset | Yes | |
| Dictionary | dic | Yes | |
| None | none | No |
Nested Variables
Some variables can contain other variables, like Lists (Vector, Array) or
Dictionaries (Hashes, Hash Tables). The following example shows the XML
representation of a List called mylist containing three Integers:
<list name="mylist">
  <i value="1"/>
  <i value="2"/>
  <i value="3"/>
</list>
Nested variables can also contain other nested variables. The following example shows a list containing two integers and a list which also contains two integers:
<list name="mylist2">
  <i value="1"/>
  <i value="2"/>
  <list>
    <i value="3"/>
    <i value="4"/>
  </list>
</list>
No restrictions are put upon the depth of the nested variables.
Special care has to be taken using Dictionaries. Dictionaries are not simply
collections of variables but collections of mappings from Strings to a
Variables. Those mappings are expressed through Tuples (String, Variable).
Consequently a Dictionary is expressed as a collection of Tuples in our XML
scheme. The following example shows a dictionary mydict containing three
mappings (foo, 1), (bar, 2) and (baz, 3):
<dict name="mydict">
  <tuple>
    <s value="foo"/>
    <i value="1"/>
  </tuple>
  <tuple>
    <s value="bar"/>
    <i value="2"/>
  </tuple>
  <tuple>
    <s value="baz"/>
    <i value="3"/>
  </tuple>
</dict>
This XML scheme provides a well defined and clean interface for other systems to communicate with Pyff: we provide a set of commands to control the Feedback Controller and the Feedback and a way to read and write the Feedback's variables. The whole protocol is operating system- and programming language independent. It is simple enough to grasp it without much effort but generic enough to send any kind of data to the Feedback.
Documentation and Examples
Part of the framework is a complete documentation of the system and its interfaces. All modules, classes and methods are also extensively documented in form of Python docstrings. Those docstrings are used by Integrated Development Environments (IDEs) and tools like Python's pydoc to generate help and documentation from the source files.
The framework also provides Tutorials explaining every major aspect of Feedback development with example Feedbacks.
Availability and Requirements
Pyff is free software and available under the terms of the GNU General Public License (GPL). The Pyff homepage is http://bbci.de/pyff. On this homepage the latest stable version of Pyff can be downloaded directly and there are links to Pyff's repository.
Pyff currently requires Python 2.6 and PyQT version 4 or later. Some Feedbacks may require additional Python modules. Pyff runs under all major operating systems including Linux, Mac and Windows.
Using Pyff
After downloading and extracting Pyff there are two directories: src and tools. To start Pyff go into src and run FeedbackController.py. This will start the Feedback Controller and the GUI.
When the GUI has started, it will automatically ask the Feedback Controller for available Feedbacks and will populate the Feedback Selector. The experimenter selects the desired Feedback from there and loads it by pushing the Init button. The Feedback Controller will now load the Feedback and send the Feedback's object variables back to the GUI where they are presented in the Table. The experimenter can now modify variables as needed and apply the changes in the Feedback by pushing the Send button.
Until now the Feedback was just loaded and initialized but not started yet. To start, pause and stop the Feedback the experimenter pushes the Play-, Pause- and Stop buttons. A Feedback can be started, stopped and paused unlimited times during the Feedback's lifetime.
To quit the Feedback the experimenter uses the quit button. Quitting the Feedback will stop and unload the Feedback from the Feedback Controller. Selecting and loading a Feedback while another one is already running, will stop and quit the running Feedback and load the new one afterwards.
Feedback Controller's Options
The Feedback Controller supports various options. To get a complete listing
start the Feedback Controller with the --help parameter.
Feedback Controller's Loglevel
The --loglevel=LEVEL paramter sets the loglevel of the Feedback Controller
and it's components. Accepted levels in increasing order are: notset, debug,
info, warning, error and critical. Setting the loglevel will cause the Feedback
Controller to output certain log messages of the given level and higher.
Feedback's Loglevel
When developing Feedback applications it is important to have a logger
dedicated for Feedbacks. Pyff provides a logger for Feedbacks which is
configurable separately from the Feedback Controller's loglevel. The
--fb-loglevel=LEVEL paramter controls the loglevel of the Feedback's logger.
It accepts the same values as the --loglevel parameter.
Additional Feedback Directory
When developing Feedback applications which are not to be included in the Pyff
framework, it might be desirable to locate them in a different directory than
Pyff's default directory for Feedbacks. The --additional-feedback-path=PATH
parameter supports this, by causing the Feedback Controller to additionally
search for Feedbacks under the given path.
Starting Without GUI
When running the Feedback Controller in an automated experiment setup where the
interaction signals are emitted from a different source than the GUI, the
experimenter can start the Feedback Controller without the GUI via the
--nogui parameter.
Configuring The Parallel Port
On different computers the parallel port sometimes has a different address than
the default. The --port=PORTNUM parameter configures the parallel port
address (in hexadecimal) the Feedback Controller tries to use.